Homelab Documentation
A place where I document the technical way of how I set up my homelab.
- Basic Proxmox Configuration
- ZFS Storage
- Wake-on-LAN
- Disable Subscription Message
- Switch Repository to non-enterprise
- GPU Passthrough
- Docker in LXC
- Powersaving
- Networking
- Monitoring&Overview
- Gaming Services
- Gaming VM
- Media Services
- Jellyfin as LXC with onboard Graphics
- Photoprism
- Navidrome
- yt-dlp(youtubedl) - Importing Youtube Shows
- Automatic Ripping Machine
- Security Services
- Miscellaneous Services
- Oddly specific issues
- NAS mit alter Samba Version per Konsole einbinden
- Reimport old existing disks with LVM
- Backup auf PBS ohne Disks zu verlieren
- WD Red Fix for high load cycle count (LCC)
- Renew SSL in Turnkey
- Certificate Issue after cluster removal
- Migrate GPG Keys from deprecated keyring to gpg.d
- D128 Render device not showing up
- Upgrade MariaDB für NC30 und MariaDB > 10.5
- Documentation Template
- Hardware Architecture
Basic Proxmox Configuration
ZFS Storage
I use ZFS as filesystem for my backend storage, due to its seamless integration with Snapshots and the Proxmox Backup Server. It is decently performant compared to the likes of ext, but offers great resilience in RAID-like solutions, is flexible and easy to use. I recommend reading through the basic ZFS introduction to clarify terms and usecases before following this guide, as this only reflects a good usecase for me.
- Create Pool
-
Zpool create -o ashift=12 mirror POOL /dev/sdc /dev/sdd mirror /dev/sde /dev/sdf - Hardening against reboot issues with /dev/sdX nomenclature
-
Zpool export POOL -
Zpool import -d /dev/disk/dev-by-id -
Zpool import -c /etc/zfs/zpool.cache -
Zpool status
-
-
- Set compression:
zfs set compression=lz4 POOL - Create datasets (+tuning)
-
zfs create pool/dataset-name -
sudo zfs set recordsize=[size] data/media/series - No-snap für datenbanksets d. Set mountpoints for datasets e. ZFS Scrub
-
- Set mountpoints for datasets
- ZFS Scrub
https://docs.oracle.com/cd/E24841_01/html/820-2313/gbbwa.html
https://www.usenix.org/system/files/login/articles/login_winter16_09_jude.pdf
https://shatteredsilicon.net/blog/2020/06/05/mysql-mariadb-innodb-on-zfs/
https://docs.oracle.com/cd/E24841_01/html/820-2313/gbbwa.html
https://unix.stackexchange.com/questions/288599/forcing-zpool-to-use-dev-disk-by-id-in-ubuntu-xenial
https://docs.oracle.com/cd/E19253-01/819-5461/gaynr/index.html
Wake-on-LAN
https://www.jm.technology/post/proxmox-wol-mac-set_april-2019/ https://pve.proxmox.com/wiki/Proxmox_Node_Management
Disable Subscription Message
https://johnscs.com/remove-proxmox51-subscription-notice/
sed -Ezi.bak "s/(Ext.Msg.show\(\{\s+title: gettext\('No valid sub)/void\(\{ \/\/\1/g" /usr/share/javascript/proxmox-widget-toolkit/proxmoxlib.js && systemctl restart pveproxy.service
Switch Repository to non-enterprise
The enterprise repository requires a bought key, hence the usage of Proxmox in a homelab usually lead to the usage of the non-production repository.
-
Comment out everything with "#" in /etc/apt/sources.list/pve-enterprise.list
-
create new file in /etc/apt/sources.list/pve-no-enterprise.list
-
insert:
deb http://download.proxmox.com/debian/pve buster pve-no-subscription -
replace "buster" with name of debian version corresponding to Proxmox version.
Sources
https://pve.proxmox.com/wiki/Package_Repositories
GPU Passthrough
- Kernel modules
- Disable drivers (Intel for iGPU, Nvidia for dedicated)
- Set up VMs accordingly
Docker in LXC
Docker LXC https://kayomo.de/blog/docker-unter-proxmox-installieren/
Powersaving
Powergoverons
Required: -
Related: -
-
apt install cpufrequtils - Check available govenors with
cpufreq-infoorcat /sys/devices/system/cpu/cpu0/cpufreq/scaling_available_governors - apply governor on reboot in crontab with
echo "#NAMEOFGOVENOR" | tee /sys/devices/system/cpu/cpu*/cpufreq/scaling_governor
See also: -
Sources:
https://wiki.debian.org/CpuFrequencyScaling
Networking
Nginx in Docker
https://nginxproxymanager.com/guide/#project-goal
Caddy
https://docs.theme-park.dev/setup/#caddy
https://caddy.community/t/caddy-reverse-proxy-nextcloud-collabora-vaultwarden-with-local-https/12052
https://caddyserver.com/docs/install#debian-ubuntu-raspbian
Monitoring&Overview
InfluxDB-Grafana-Telegraf
- influx update breaks config !!! Apt hold influx (+grafana?)
https://schroederdennis.de/tutorial-howto/proxmox-monitoring-einrichten-installieren-influxdb-grafana/
https://www.howtoforge.com/tutorial/how-to-install-tig-stack-telegraf-influxdb-and-grafana-on-ubuntu-1804/
https://foldingforum.org/viewtopic.php?f=14&t=35660 - HDD Temps Telegraf (install hddtemp daemon!)
https://wiki.ubuntuusers.de/hddtemp/
https://github.com/influxdata/telegraf/tree/master/plugins/inputs/hddtemp - Add problematic smart stats manually:
https://askubuntu.com/questions/474669/ssd-temperature-sensor-readout-with-hddtemp
https://github.com/influxdata/telegraf/blob/master/plugins/inputs/disk/README.md
https://stackoverflow.com/questions/45171907/influxdb-how-to-update-duration-of-an-existing-database - Format Dircount as influx out: https://www.reddit.com/r/grafana/comments/os96l1/influxdbtelegraf_exec_display_issues/h6n6pc6/?context=3
- add telegraf user to nextcloud group in order to be able to scan directories.
https://du.nkel.dev/blog/2021-05-05_proxmox_influxdb/
https://towardsdatascience.com/influxdb-data-retention-f026496d708f - Delete old data in influx
use DATABASE +
https://stackoverflow.com/questions/38587898/in-influxdb-how-to-delete-all-measurements - Countdirectories
Befehl in /usr/bin/countdirectories anlegen:
#!/bin/sh
count=$(ls -l $1 | grep -c ^d)
echo dircount,path=$1 value=$count
OneUptime
Requirements:
-Docker and Docker compose -Node.js and NPM installed.
git clone https://github.com/OneUptime/oneuptime.git
cd oneuptime
Copy config.example.env to config.env
cp config.example.env config.env
Optional: change config.env
npm run dev
https://github.com/OneUptime/oneuptime
Gaming Services
MineOS
Serveradministration
Export aus Nitradoservern:
https://wiki.nitrado.net/de/Map_herunterladen_bei_Minecraft
Dafür brauchst du zusätzlich den Client von Filezilla:
https://filezilla-project.org/download.php?type=client
Dabei sollte eine ZIP-Datei rauskommen, die du eventuell selber noch erstellen musst, indem du das Überverzeichnis manuell zipst, was heruntergeladen wird.
Neuen Server aufsetzen
Import bestehender Welten in MineOS
https://minecraft.codeemo.com/mineoswiki/index.php?title=Importing_a_world
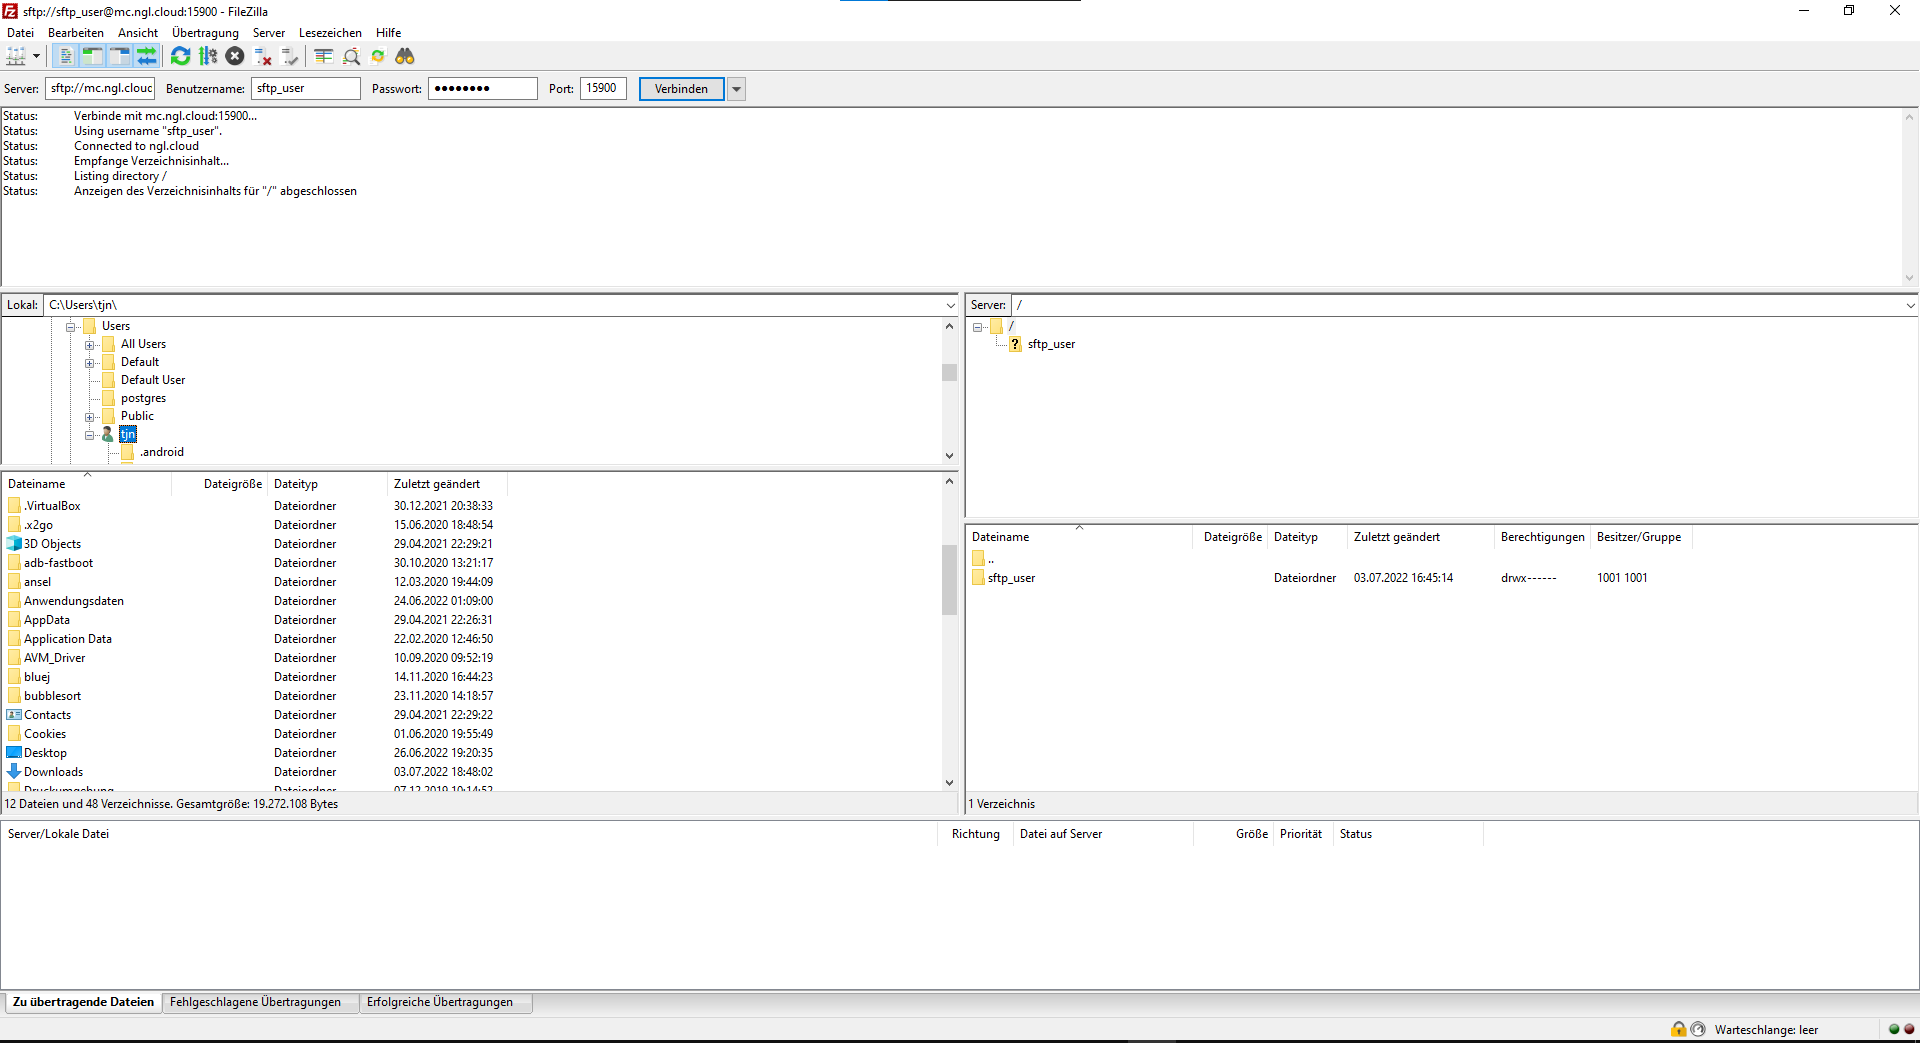
Eigentlich nur verkehrt herum wie beim Export. Ich empfehle Filezilla, damit hab ich es getestet. Logins sind wie folgt:
Server: sftp://Serveradresse
User: sftp_user
Port: 15900
Importieren kannst du, indem du mit Rechtsklick hoch- bzw runterladen entsprechende Dateien hin und her schiebst. Nach dem Import sieht es dann etwa so aus:
Der Linke Teil ist dabei dein Rechner und funktioniert wie der Explorer. Rechts ist der Server. Du musst noch in den korrekten Importpfad auf dem Server navigieren, das sieht dann so aus:
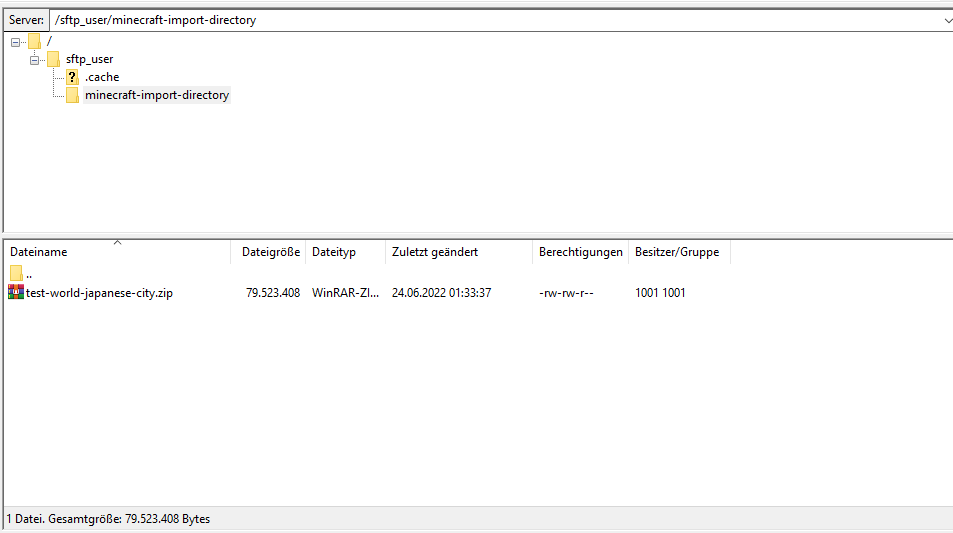
Eine Testdatei liegt zum Vergleich drin. Du kannst sie dir auch gerne runterladen und aufmachen, um zu vergleichen, wie deine Datei aussieht. Wenn hier eure Welt als ZIP drin liegt, geht es auf der Verwaltungsebene weiter.
Start eines Importservers
Mit der importierten ZIP kannst du jetzt einen neuen Server starten.
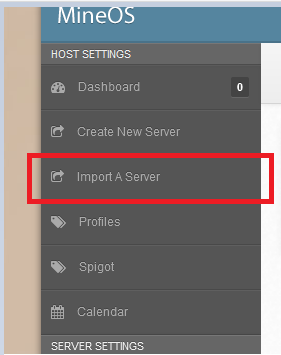
Create Server from Archive erstellt eine neue Standard Serverinstanz. Diese wird dann am oberen Bildschirmrand unter Currently Selected Servers ausgewählt.
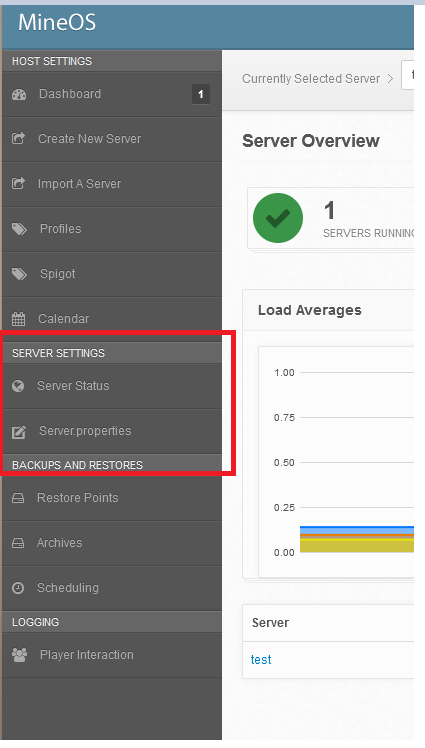
Die Software ist so eingestellt, dass nur der erste Server aus dem Internet erreichbar ist, daher werden weitere Serverinstanzen zwar laufen, aber nicht erreichbar sein.
Sobald der Server ausgewählt ist, kannst du auf der linken Seite die Serversettings sehen. Alles andere sind Einstellungen für die Software, an denen bitte nicht rumspielen, weil es sonst evtl nicht mehr läuft (auch wenn ich das schnell zurücksetzen kann, falls doch mal was schief geht).
Vorbereitung MC-Server-Framework / Update MC-Server
Bevor der Server gestartet werden kann, muss eine MC-Server-Datei geladen werden.
Servertypen
Vanilla
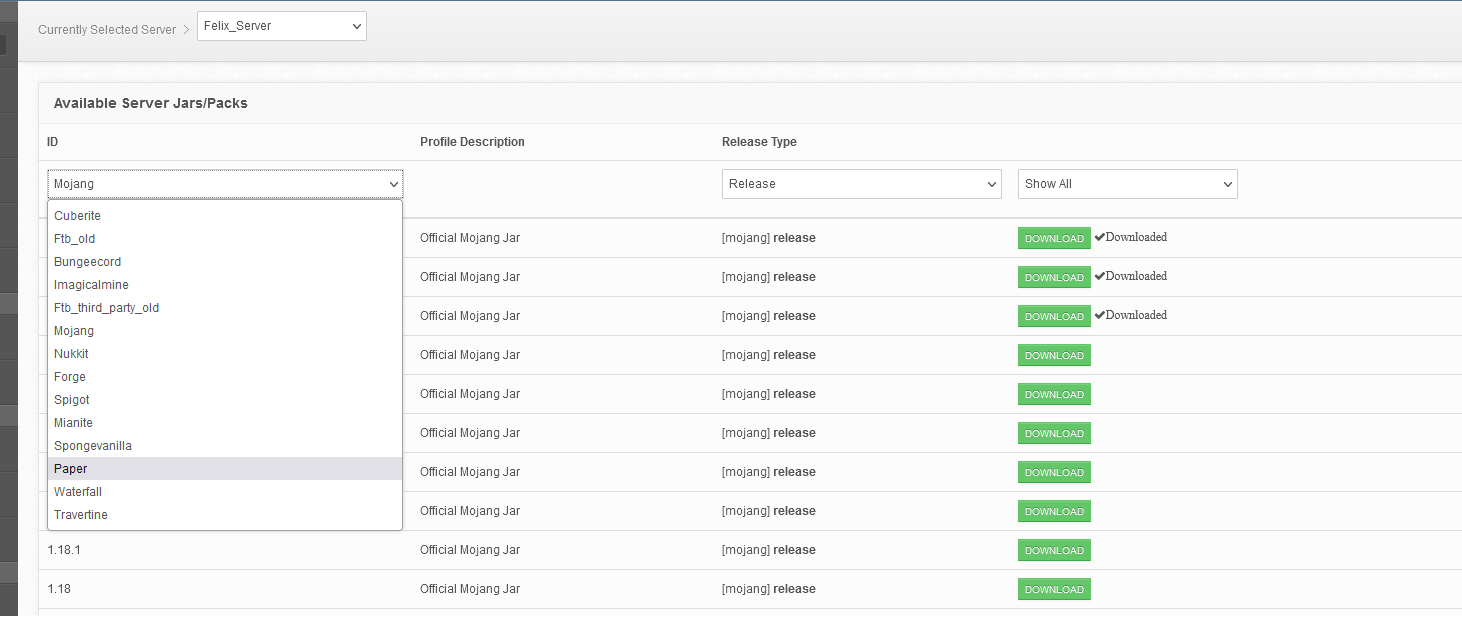
Der Vanilla Minecraftserver ist in der aktuellsten Version immer unter Profiles downloadbar. Danach entsprechend auf der Serverseite die zu benutzende Version umstellen und den Server neustarten.
Alternativ: Paper
Für alternative Server muss nur die neuste Paper-Datei statt der Vanilla-Datei heruntergeladen und analog zur Vanilla-Variante auf der Serverseite als JAR ausgewählt werden. Vorsicht, die neuste Version ist nicht immer oben! Danach den Server neustarten. ! Achtung !: Wenn Paper genutzt wird und man wieder zu Vanilla zurück will, müssen einige manuelle Änderungen am Save vorgenommen werden: https://docs.papermc.io/paper/migration Sektion From Paper to Vanilla.
Alternativ: Fabric
Vanilla-ähnlicher Server mit wenig Optimierungen. Farms und Exploits funktionieren wie in Vanilla auf Kosten von zusätzlichen Lags und schlechterer Performance im Vergleich zu Paper. Muss händisch eingerichtet werden. Siehe Fabric Dokumentation.
Revert einer Fabric/Spigot Welt zurück zu Vanilla
https://serverminer.com/article/how-to-convert-a-paper-spigot-world-to-a-vanilla-world/
Update Ablauf Quick-Checklist
- Server stoppen
- Vanilla bzw. Alternative herunterladen
- Auf Serverseite "Accept EULA" und erst danach "Restart" anklicken
Server Settings
Auf einem neuen Server sollten alle Einstellungen wie folgt sein:
Unter Server Actions:
Change profile to: akutellste
Eventuell musst du einmal auf Accept EULA klicken, wenn es nicht starten, weil Java geupdated wurde, sollte aber im Normalfall nicht passieren.
Broadcast to LAN: an
Start server on boot: an
Alles andere auf Standard lassen.
Java Settings
Change runnable to: Entweder minecraft-server-1.19 (nicht gemoddet) oder spigot 1.19 (für modded) bzw. die entsprechend aktuelle Version der Alternativen. Ich rate aus Performancegründen zu Paper.
Memory Allocation:
XmX: 8192 (geht bis 9000, falls der Server langsam ist oder crasht, alles darüber lässt das System in der aktuellen Konfiguration abstürzen. Spiel ruhig damit rum und probiers aus, allerdings muss der Server nach jeder Änderung neu gestartet werden.)
Xms: 4096 (Bitte nicht ändern)
Additional Java Arguments und Additional Jar arguments auf Standard bei Problemen ansonsten siehe Paper-Dokumentation.
Alles andere ist für den Betrieb nicht relevant.
Backups
Unter Restore Points kannst du Sicherungen anlegen, falls ihr mal was Dummes machen wollt, die lassen sich danach per Knopfdruck einfach wieder einspielen. Archives erstellt die ZIP für einen Export direkt im Browser statt mit dem Umweg über Filezilla.
Jetzt sollte der Server für alle unter Serveradresse erreichbar sein.
Administration des laufenden Servers
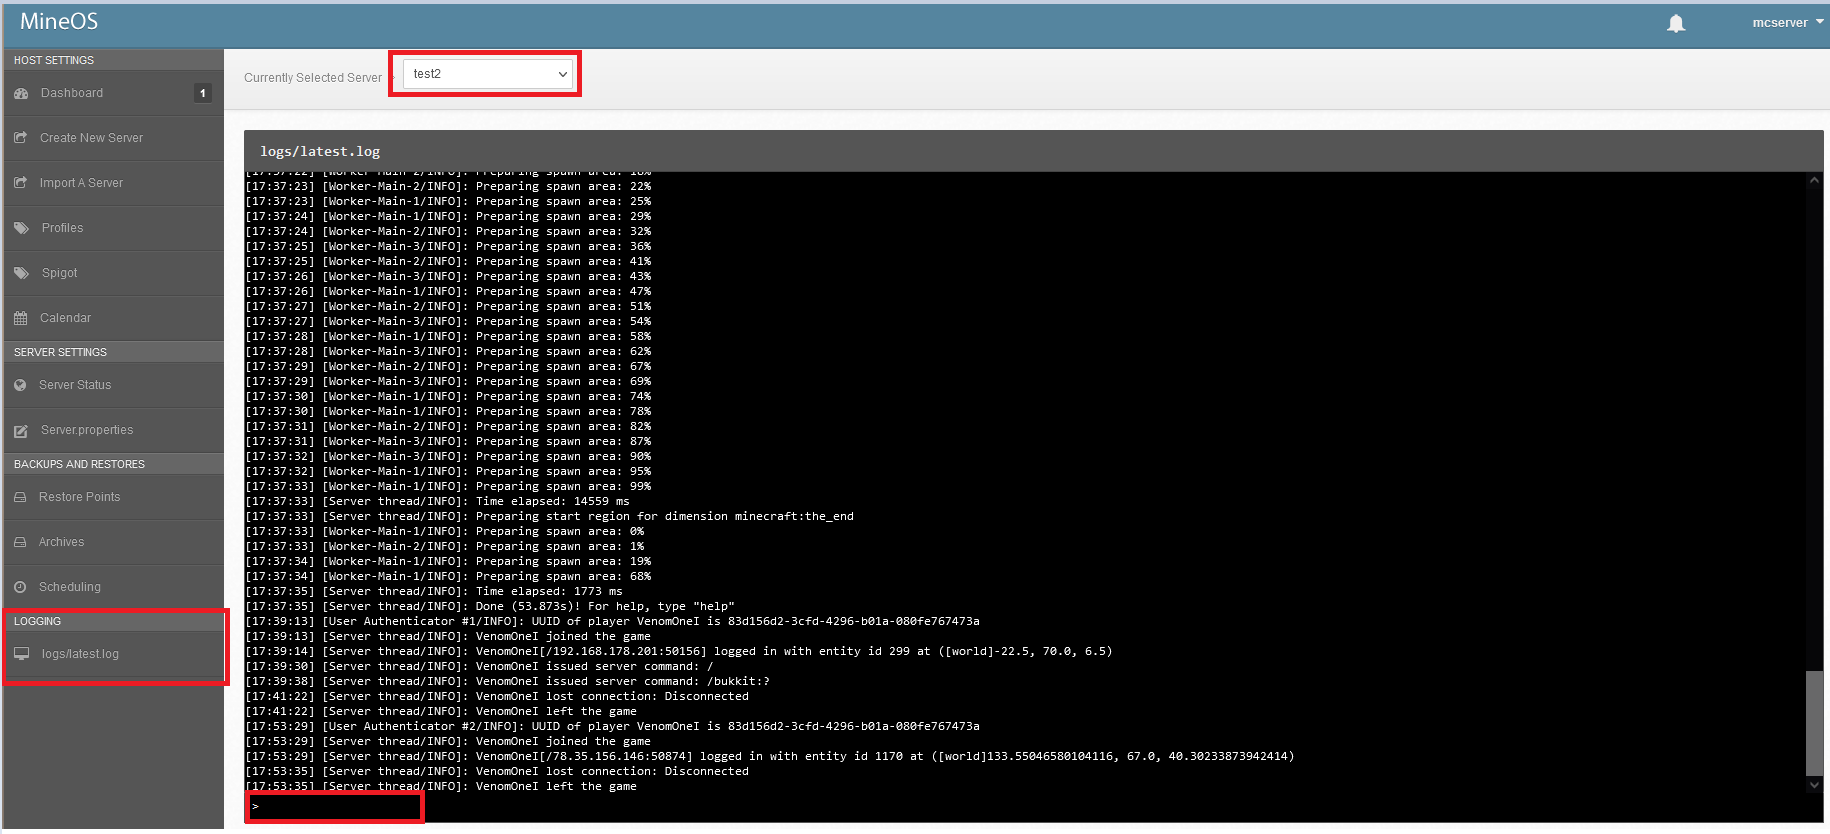
Falls ihr rcon für Servercommands benutzt, ist die Adresse dafür Serveradresse:15889 Falls ihr die Serverkonsole braucht, um z.B. jemanden zum Admin zu machen oder den Gamemodus zu ändern, ist die unter Logging/logs/latest.log, was sichtbar ist, sobald man oben wieder einen Server ausgesucht hat.
Löschen
Um den Server zu löschen, einfach den Server stoppen, alle drei Haken unter Delete Server setzen und auf delete drücken. Danach kann z.B. ein alter Server importiert werden oder Server für eine neue Welt erstellt werden. Server importieren. Wenn du oben die Datei korrekt importiert hast, dann sollte jetzt, wenn du auf "Import a Server" klickst, deine ZIP dort auftauchen.
Finetuning
Je nachdem, welchen Basisserver ihr nutzt (Vanilla, Spigot, Paper, etc.), entsprechende Guides und Settings nutzen.
Minecraft-spezifisch
Schon etwas veraltet, aber immer noch applicable für die Basisoptionen: https://www.spigotmc.org/threads/guide-server-optimization%E2%9A%A1.283181/
Aktueller:
https://apexminecrafthosting.com/server-optimization/
Java-spezifisch
https://aikar.co/2018/07/02/tuning-the-jvm-g1gc-garbage-collector-flags-for-minecraft/
Paper-spezifisch:
https://docs.papermc.io/paper/aikars-flags https://github.com/YouHaveTrouble/minecraft-optimization Für Exploits/Special Farming: https://shockbyte.com/billing/knowledgebase/495/How-to-Allow-Bedrock-Breaking-TNT-Duping-and-Other-Exploits-in-PaperMC-Servers.html
Die entsprechende Datei lässt sich per SSH/Filezilla aufrufen/ändern.
Host Administration
Protected SFTP access
MineOS bindmount in crontab for sftp user, because no fstab in LXC:
@reboot mount -o bind /root/mineos-path/gamefiles/minecraft/import/ /home/sftp_user/minecraft-import-directory/
Issues
Server instance not starting - blocked port
https://discourse.codeemo.com/t/cant-start-server-in-webui/5732
- Check usage of 25565 with
netstat -tulpn | grep 25565 - Kill PID
- Start instance in WebUI
External Access Issues
- Check accessibility at https://mcsrvstat.us/
- Internal Portforwarding seems to make trouble on LXC setups, thus the standard ports have to be used. Make sure, 25565 is open and forwarded on TCP and UDP traffic in router.
Server Profiles not refreshing
https://wiki.codeemo.com/maint/webui.html
supervisorctl restart mineos
Host OS Upgrade
Bootsettings reference:
-XX:+UseG1GC -XX:+ParallelRefProcEnabled -XX:MaxGCPauseMillis=200 -XX:+UnlockExperimentalVMOptions -XX:+DisableExplicitGC -XX:+AlwaysPreTouch -XX:G1NewSizePercent=30 -XX:G1MaxNewSizePercent=40 -XX:G1HeapRegionSize=8M -XX:G1ReservePercent=20 -XX:G1HeapWastePercent=5 -XX:G1MixedGCCountTarget=4 -XX:InitiatingHeapOccupancyPercent=15 -XX:G1MixedGCLiveThresholdPercent=90 -XX:G1RSetUpdatingPauseTimePercent=5 -XX:SurvivorRatio=32 -XX:+PerfDisableSharedMem -XX:MaxTenuringThreshold=1 -Dusing.aikars.flags=https://mcflags.emc.gs -Daikars.new.flags=true
https://www.spigotmc.org/wiki/timings/
Vanilla-like experience in Paper
https://docs.papermc.io/paper/vanilla/
Satisfactory Dedicated Server
https://linuxgsm.com/servers/sfserver/
Issues with Update 7 and changed binary names: https://github.com/GameServerManagers/LinuxGSM/issues/4241
Gaming VM
Default Audio Device resetting on reboot
https://gist.github.com/ChriRas/b9aef9771a97249cb4620e0d6ef538c4
Media Services
Jellyfin as LXC with onboard Graphics
Configuration of Jellyfin as LXC with passthrough of onboard iGPU
Tested on AsRock J4105/J5005 and Intel i5 10400F.
There is two ways of running containers in need of the onboard GPU. The easiest way is as priviledged container, since this allows for direct access to the render device of the host without the hassle of right management. This however comes with security issues, because it allows access to parts of the hosts system as root. In a system not accessible from the outside, this likely isn't a concern, but it still can be mitigated by running Jellyfin as unpriviledged LXC with UID/GID mapping to only allow isolated access to render devices. Which option you chose depends on your usecase and stance of safety and isolation.
This setup requires the appropriate driver for your GPU to be installed on the host system and the LXC. A working driver should yield output with "vainfo".
Some instructions are for older versions, but persistent on newer systems, I will thus keep the older sources.
General Installation of Jellyfin
https://www.linuxcapable.com/how-to-install-jellyfin-media-server-on-ubuntu-20-04/
https://cetteup.com/216/how-to-use-an-intel-vgpu-for-plexs-hardware-accelerated-streaming-in-a-proxmox-vm/
Priviledged:
https://www.codetd.com/de/article/11969233
https://blog.peterge.de/jellyfin/
Unpriviledged
UID/GID mapping for /dev/dri128 und /dev/render
https://forum.jellyfin.org/t/installation-uid-and-gid/821
https://pve.proxmox.com/wiki/Unprivileged_LXC_containers
https://github.com/ahuacate/pve-medialab#203-create-a-ubuntu-1804-lxc-for-jellyfin---ubuntu-1804
Common Issues
Jellyfin not upgrading:
https://github.com/jellyfin/jellyfin/issues/5448
Integration with other Services
Encoding/Decoding Issues
Make sure, i965-shaders from the non-free repo is installed, not intel-media, and version of libva and driver are the same on host and guest. Intel-media-hd as driver for i5/i7 6th Gen. and higher instead of i965.
Kodi
https://github.com/jellyfin/jellyfin-kodi
Sources
Photoprism
https://docs.photoprism.app/getting-started/docker-compose/
Enable hardware transcoding for Intel GPUs
https://github.com/photoprism/photoprism/issues/1337
Unlock features behind paywall: https://www.reddit.com/r/selfhosted/comments/13fj282/tutorial_build_your_own_unrestricted_photoprism_ui/
transcoder settings https://docs.photoprism.app/getting-started/advanced/transcoding/
Navidrome
yt-dlp(youtubedl) - Importing Youtube Shows
https://github.com/yt-dlp/yt-dlp
Pip install to segment from Jellyfin. On a separate machine, use repository for easier updating.
Default run with Metadata and Subtitles fit for Jellyfin:
Automatic Ripping Machine
https://b3n.org/automatic-ripping-machine/
Security Services
Wireguard VPN LXC
Wireguard headless:
Vorher ausführen:
apt install resolvconf
https://apfelcast.com/die-einfachste-opensource-vpn-wireguard-installation-auf-proxmox-lxc/?cookie-state-change=1632921049297
https://www.ckn.io/blog/2017/11/14/wireguard-vpn-typical-setup/
https://github.com/EmbarkStudios/wg-ui
https://stackoverflow.com/questions/46645910/docker-rootfs-linux-go-permission-denied-when-mounting-proc
https://www.stavros.io/posts/how-to-configure-wireguard/
Wireguard mit Webverwaltung: https://docs.firezone.dev/deploy/install-server#manual-install
Adguard LXC
https://blog.wydler.eu/2021/02/21/adguard-home-im-netzwerk-implementieren/
https://linuxconfig.org/how-to-turn-on-off-ip-forwarding-in-linux
Einrichtung auf Port 3000
Miscellaneous Services
Eclipse CHE
https://coder.com/docs/code-server/latest/guide
https://coder.com/docs/code-server/latest/install
listeningadress von localhost in config auf IP umstellen
Bookstack
https://www.bookstackapp.com/docs/admin/installation/#ubuntu-2004
edit /var/www/.env change "appurl" http to https
ioBroker
installation: https://www.iobroker.net/#de/documentation/install/linux.md
Nextcloud
-
GID/UID Mapping für ZFS Passthrough
-
https://pve.proxmox.com/wiki/Unprivileged_LXC_containers
FIX für subuid/guid:
https://lxc-users.linuxcontainers.narkive.com/KQxz7W3Z/uid-range-not-allowed - FIX für "nogroup"-Problem
https://forum.proxmox.com/threads/unable-to-map-to-www-data-user-in-container.49695/
pct mount CTIDfind /var/lib/lxc/CTID/rootfs -uid 100033 -exec chown 1005 '{}' \;find /var/lib/lxc/CTID/rootfs -gid 100033 -exec chgrp 1005 '{}' \; - Verzeichnis auf ZFS umsetzen
- Apache in CT deaktivieren (stop +disable)
- Original Nextcloudfiles ordener kopieren
- CT abschalten und mapping + mp0 mount auf ursprüngliches datenverzeichnis vornehmen
- CT anschalten kopie wieder in original ordner
- Enable + start apache
-
'skeletondirectory' => '', - Trusted domains -> reverse proxy ip eintragen
-
https://pve.proxmox.com/wiki/Unprivileged_LXC_containers
FIX für subuid/guid:
-
If you just want to remove the default skeleton (no files added on first launch), do the following:
- open config file with vi /app/config/config.php
- insert line 'skeletondirectory' => ''on a new line (i to enter insert mode)
- press esc, then :wq and <enter> to write and save
Overleaf
- Setup according to manual: https://github.com/overleaf/toolkit/blob/master/doc/quick-start-guide.md
- Install full-scheme dependencies in dockercontainer: https://github.com/overleaf/overleaf/issues/876\
- Upgrading: https://github.com/overleaf/toolkit/blob/master/doc/ce-upgrading-texlive.md#installing-packages
tlmgr update --self\
tlmgr install scheme-full
Own script:
#!/bin/bash
docker exec -it sharelatex tlmgr --repository http://www.preining.info/tlgpg/ install tlgpg
docker exec -it sharelatex tlmgr install scheme-full
Oddly specific issues
NAS mit alter Samba Version per Konsole einbinden
https://forum.proxmox.com/threads/cifs-issue-error-with-cfs-lock-file-storage_cfg-working-now-but-shows-question-mark.45962/
pvesm add cifs extbackup --server 192.168.178.31 --share share --username server --password server --smbversion 2.0
Reimport old existing disks with LVM
- Remove old LVM Volumes
- lvremove OLDVOLUME
- Delete old partition table (REMOVES ACCESS TO DATA !!!)
dd if=/dev/zero of=/dev/sda bs=512 count=1
Recreate LVM-Thin
Backup auf PBS ohne Disks zu verlieren
https://forum.proxmox.com/threads/remove-vm-but-retain-disk.33939/
WD Red Fix for high load cycle count (LCC)
https://withblue.ink/2016/07/15/what-i-learnt-from-using-wd-red-disks-to-build-a-home-nas.html
Renew SSL in Turnkey
https://www.turnkeylinux.org/docs/confconsole
Certificate Issue after cluster removal
- Remove keys as instructed by pve messages after re-entering node
- Remove all remaints in softlinks in pve folder structure as well
-
pvecm updatecerts
https://forum.proxmox.com/threads/cant-connect-to-destination-address-using-public-key-task-error-migration-aborted.42390/
Migrate GPG Keys from deprecated keyring to gpg.d
-
apt update-> identify deprecated keys -
apt-key list-> identify last 8 symbols of corresponding key signature. Remove spaces -
apt-key export XXXXXXXX | gpg --dearmour -o /etc/apt/trusted.gpg.d/SERVICENAME.gpg
D128 Render device not showing up
nomodeset in grub disabled d128render device. Remove nomodeset.
Upgrade MariaDB für NC30 und MariaDB > 10.5
-
Lege Backup an (siehe unten):
mysqldump -u root -p --opt --all-databases -r backup.sql
-
Entferne OS mysql-server* und mysql-server-core*
apt remove mysql-server* mysql-server-core*
-
Installiere MariaDB Repository (Korrigiere ggf. Version. aktuelle LTS 10.11)
curl -LsS https://r.mariadb.com/downloads/mariadb_repo_setup | sudo bash -s -- --mariadb-server-version="mariadb-10.11"
Mehr Infos unter https://mariadb.com/kb/en/mariadb-package-repository-setup-and-usage/
-
Reinstalliere alle nötigen Pakete:
apt update && apt-get install mariadb-server mariadb-client mariadb-backup
-
ggf. default charset anpassen. (für nextcloud utf8mb4)
mysql -uroot -p --default-character-set=utf8mb4
-
Restore:
mysql
mysql> SET names 'utf8mb4';
mysql> SOURCE backup.sql;\Aus: https://stackoverflow.com/questions/9497869/export-and-import-all-mysql-databases-at-once
-
ggf. MariaDB Security prüfen. i.e. Root PW gesetzt und alte DB Passwörter funktional.
Documentation Template
Intro-(What,Why):
Required: -
Related: -
TEXT TEXT TEXT TEXT
See also: -
Sources: -
Hardware Architecture
APC UPS
Basic Setup https://www.brunweb.de/konfiguration-einer-apc-usv-unter-proxmox/
Master-Slave-Setup https://www.pontikis.net/blog/apc-ups-master-slave-setup-apcupsd